Monday, 1 February 2021

Friday, 1 January 2021
Wednesday, 23 December 2020
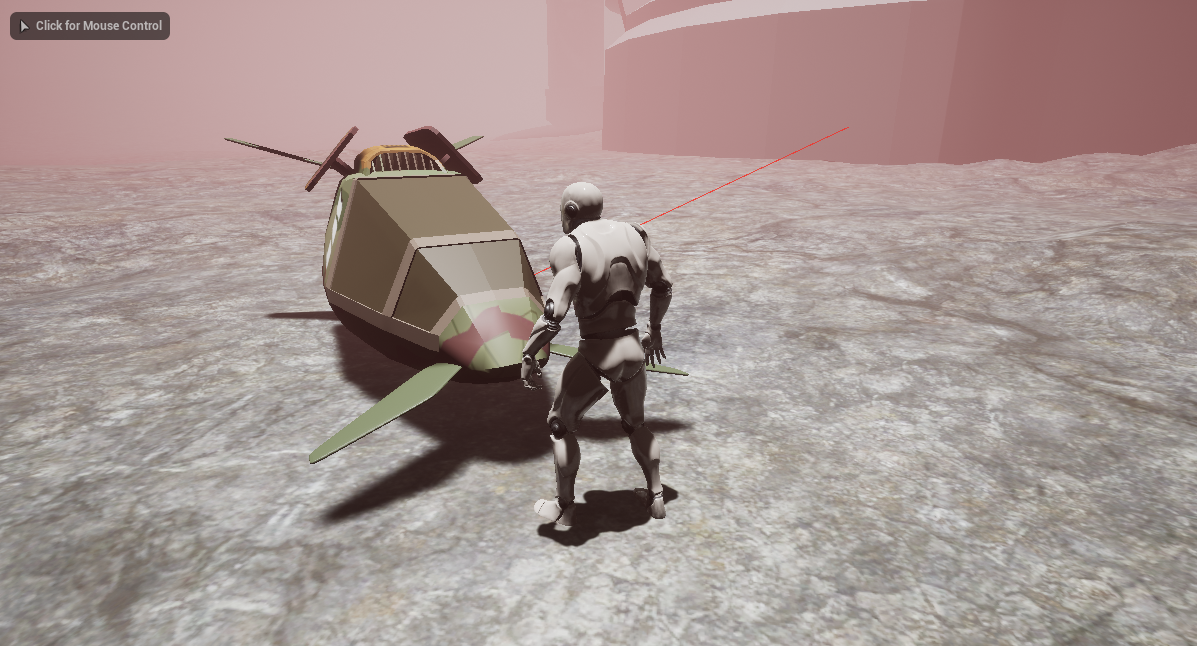
Preview: New beginner ship - Gypsy
I've been drawing ships a little, taking inspiration from loads of designs on Pinterest.
It's been a while coming, but I've finally finished modeling the new starter ship.
There's still a bit to be done to replace our current Silver Y, but I just wanted to show off some progress here.


Friday, 20 March 2020
Wednesday, 26 February 2020
Hardwar remake -- New Silver-Y texture
I was playing around with blender UV mapping and decided to quickly make a texture for the moth.
I'd been a bit tired of fixing bugs in the game and needed a bit of a creative outflow.
Took me about 2 hours to do, here it is:
I'd been a bit tired of fixing bugs in the game and needed a bit of a creative outflow.
Took me about 2 hours to do, here it is:


Hardwar remake -- flight and buildings videos
It's been a while since I posted, so this is a quick post with some video footage, as pictures speak a 1000 words and video 10000 more.
Here's me flying around the rough buildings I placed in my test crater.
Here's me flying around the rough buildings I placed in my test crater.
This is me testing out the initial airlock system to see if I can enter the badly textured building I added:
Saturday, 8 February 2020
Hardwar remake -- Lightwells and Alpha crater

Just an update: Here's my attempt(still needs a lot of texturing work) at remaking Alpha crater.
Hardwar has a game mode where you only play in the Alpha crater. That must mean that Alpha has all the stores you need for survival. So I'm prototyping everything in Alpha for now, once I can get it all to work here, I can branch out to other craters.
Hardwar has a game mode where you only play in the Alpha crater. That must mean that Alpha has all the stores you need for survival. So I'm prototyping everything in Alpha for now, once I can get it all to work here, I can branch out to other craters.


Hardwar remake -- Creating buildings
Just a quick update on the progress.
I've started making buildings and thinking through a modular way to make as many types of hangars with just a few basic parts. Here's some screenshots:
I've started making buildings and thinking through a modular way to make as many types of hangars with just a few basic parts. Here's some screenshots:


Hardwar remake - Giving a game the rebirth it deserves

 |
| The original starter moth - the humble Silver Y |
I think I was 13 years old when I picked up a cheap looking PC game from a bargain bin in a One Price store. It cost me R30, which is about $2. It seemed to have graphics similar to that of Wipeout, slightly futuristic/glitchy/angled glyphs all over it.
After installing it, I launched my moth(spaceship) and suddenly saw a HUGE open space I could fly in with buildings sticking out of the mist.
I'd never played a space game before, so this was overwhelming! I flew around and saw other ships passing me. I found a tunnel of sorts and tried to fly through it, but promptly crashed, since I couldn't really handle the controls.
I reoriented and flew down the tunnel and got to a new open area with a strange bridge shaped rock with a railway track going through it. I found that I could shoot lasers and started firing at a random spaceship, not too far away.
30 seconds later a black screen appeared with the words "Game Over".
Well, that sucked...
Little did I know of the depths of addiction this game would cause me, that I would join it's online community later when internet became a thing in South Africa, and that I would witness various attempts at rebuilding this great game, that really deserved way more sales than it got.
This is me, 10 years after my last contact with that community, now a coder during the day... I happened on a Unreal Engine tutorial on YouTube, which made me realise that "I know Kung Fu" -- I could understand it and the code behind it, I had become the solution to a Hardwar remake.
Anyway, here's some screenshots of my progress so far... mostly just modelling stuff, not much done on the scripting side yet, but it's great to see progress.
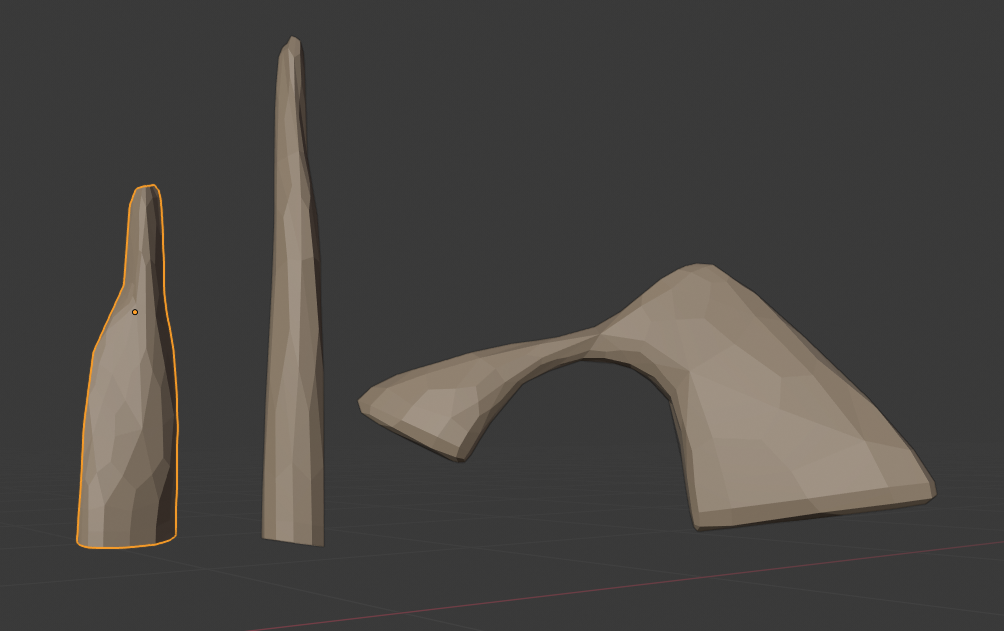 |
| Crater rocks of Alpha Crater. |
 |
| Ah, my favourite moth, the cheapest too - the Silver Y. |
 |
| Another angle of the Silver Y, now with solar panels. |
Tuesday, 14 May 2019
{JSON} sucks in kotlin/java
As a dev with web background, I am used to easily running a Json.parse() here and there and instantly I get to use my JSON object.
Recently as a noob App dev though... wow... are people just this incapable of answering Stack Overflow questions or what??
So if, like me, you were unable to parse JSON to an object in Kotlin and went down a rabbit hole for 3 hours, maybe this will help you:
Recently as a noob App dev though... wow... are people just this incapable of answering Stack Overflow questions or what??
So if, like me, you were unable to parse JSON to an object in Kotlin and went down a rabbit hole for 3 hours, maybe this will help you:
val jsonObj = JSONObject("{\"valu\":\"77\"}")

var myVar: String? = nullif (jsonObj.has("valu")) {
    myVar = jsonObj.get("valu") as String
}
Wednesday, 15 August 2018
Some errors encountered with app dev.
iOS:
Fonts:
Just a note, if you ever add new fonts to a react project, make sure you search the whole project for the old font, there are cache files that contain references to it.Also delete the contents of the ios/build directory and make sure each font filename is the same as the actual font's name, Eg "hello-world.ttf" cannot have an actual font name of 'hello world'.
React-Native:
The app does not see my code changes:
Either run the following commands or create an alias for them:This command clears all your watchman roots, repeat until the roots show as empty:
watchman watch-del-all (repeat until roots are cleared '[]')
This will clear npm cache, meaning no pesky npm installs to get it all working again:
npm cache clean --force use that to clear out node cache
alias uncache-react="watchman watch-del-all;watchman watch-del-all;npm cache clean --force"
Build a release from react-native command:
react-native run-android --variant=releaseChecking if in DEV mode in the app:
if (__DEV__) {do stuff
}
Thursday, 29 June 2017
Ubuntu has bad memory(management)(fix)
I've had a problem since I switched to ubuntu/linux. It just gets slow and freezes like crazy, and I'm not even doing much. In contrast my Windows PC is able to open about 60 tabs in chrome and allow me to play a game while that's running, with no slow-downs.
So I investigated, finally finding a solution on this askubuntu.com post:
askubuntu-link
So here's what we do:
total memory in KB: +-8000000kb (8gb)
total CPU cores: 4 cores
min_free_kbytes = (total memory * 5%) / cores = 100000kb
Set minimum free ram:
sudo sysctl -w vm.min_free_kbytes=100000
So I investigated, finally finding a solution on this askubuntu.com post:
askubuntu-link
So here's what we do:
total memory in KB: +-8000000kb (8gb)
total CPU cores: 4 cores
min_free_kbytes = (total memory * 5%) / cores = 100000kb
Set minimum free ram:
sudo sysctl -w vm.min_free_kbytes=100000
Set how much of the disk to cache:
sudo sysctl -w vm.swappiness=5
Now to make it permanent just add the following to you /etc/sysctl.conf file:
vm.swappiness=5
vm.min_free_kbytes=100000
Hope this helps someone!
Now to make it permanent just add the following to you /etc/sysctl.conf file:
vm.swappiness=5
vm.min_free_kbytes=100000
Hope this helps someone!
Thursday, 11 May 2017
Cheap things that will improve your FPV flying the most.
I have learnt a few things in the last few months of flying and I would like to share it with the world. There's no use struggling when others have already made the mistakes for you.
Here goes:
My recommendation is DALProp's CYCLONE Series T5045C.
I am on my second set, only because the first set started looking ugly.
These things just never break, they bend, which means they absorb the shock so your engines won't.
Bent prop? Just bend it back and rip further.
I started off with dual blade props, but seeing all the pros use tri-blades made me want to try it.
I took the plunge and happened to buy the cyclones. They were only $3 a pack, which really isn't bad.
When they arrived I bolted them to my quad and went flying.
What I experienced is stability and a quiet hum of the blades piercing the air. Such a soothing sound.
But that's not all! I got about 15% longer flight time on these babies. 3$ for that kind of improvement is totally worth it!
I assumed it's only the GoPros recording the flight that have a wide field of view.
I was wrong!
Following Mr. Steele's advice, I found a similar lens to the one he uses. The GoPro Hero 2 replacement lens.
On the first flight I felt like all my other flights were done while staring through a toilet roll. I could confidently roll, knowing exactly where the ground is. My moves smoothed out and were less jerky as well as crashing becoming a rare event.
Pretty good for a $9 spend!
I can't stress this enough though, especially if you're on a budget build like me.
Simulators have unlimited battery hours, indestructible copters and physics settings to make it harder on yourself while training.
Click here for simulator cable.
Sims I would suggest are:
1. Hotprops - Free, very good for freestyle
2. FPV Freerider - $5, good overall, but controls are a bit iffy.
3.DRL Racing Simulator - Free, nice graphics, iffy settings, can't get a realistic feel from it.
I'll be putting together an absolute dummies guide to PID tuning. In the meanwhile, check out Joshua Bardwell's videos, he does things proper and takes you through all the steps.
Setting my PIDs has made me feel like I'm the one holding the direct controls of my quad and not the flight controller. When I roll left, it rolls left, when I stop and pitch backwards, it does so. Make your digital-iness disappear in your controls and give yourself more of an analog feel.
Joshua Bardwell's PID vids
Here goes:
1. Buy good props. (cost: $3)
Or in my case, buy unbreakable 3 blade performance props.My recommendation is DALProp's CYCLONE Series T5045C.
I am on my second set, only because the first set started looking ugly.
These things just never break, they bend, which means they absorb the shock so your engines won't.
Bent prop? Just bend it back and rip further.
I started off with dual blade props, but seeing all the pros use tri-blades made me want to try it.
I took the plunge and happened to buy the cyclones. They were only $3 a pack, which really isn't bad.
When they arrived I bolted them to my quad and went flying.
What I experienced is stability and a quiet hum of the blades piercing the air. Such a soothing sound.
But that's not all! I got about 15% longer flight time on these babies. 3$ for that kind of improvement is totally worth it!
2. Buy the right FPV lens (about $9)
I remember watching an endless stream of FPV freestyle videos and wondering how the pilots had such confidence about their surroundings, almost a better spacial awareness if you will.I assumed it's only the GoPros recording the flight that have a wide field of view.
I was wrong!
Following Mr. Steele's advice, I found a similar lens to the one he uses. The GoPro Hero 2 replacement lens.
On the first flight I felt like all my other flights were done while staring through a toilet roll. I could confidently roll, knowing exactly where the ground is. My moves smoothed out and were less jerky as well as crashing becoming a rare event.
Pretty good for a $9 spend!
3. Simulator Cable (price tbc)
I know, I know. You've heard this before and you're getting sick of hearing it.I can't stress this enough though, especially if you're on a budget build like me.
Simulators have unlimited battery hours, indestructible copters and physics settings to make it harder on yourself while training.
Click here for simulator cable.
Sims I would suggest are:
1. Hotprops - Free, very good for freestyle
2. FPV Freerider - $5, good overall, but controls are a bit iffy.
3.DRL Racing Simulator - Free, nice graphics, iffy settings, can't get a realistic feel from it.
4. Set your PIDs (Free!)
So you were terrible at mathematics in highschool, that doesn't mean you can't set your PIDs.I'll be putting together an absolute dummies guide to PID tuning. In the meanwhile, check out Joshua Bardwell's videos, he does things proper and takes you through all the steps.
Setting my PIDs has made me feel like I'm the one holding the direct controls of my quad and not the flight controller. When I roll left, it rolls left, when I stop and pitch backwards, it does so. Make your digital-iness disappear in your controls and give yourself more of an analog feel.
Joshua Bardwell's PID vids
Tuesday, 11 April 2017
New ECMA Script 6 ES6 Ternary operators
I struggled to wrap my head around these two new operators, the && and the ||.
So I decided to write a post about them to explain them to myself.
var || 'hi' will return 'hi' when false
var && 'hi' will return 'hi' when true
So:
var || 'hi' means:
return 'hi' if var is false
--or--
var ? var : 'hi'
and:
var && 'hi' means:
return 'hi' when var is true
--or--
var ? 'hi' : var
So I decided to write a post about them to explain them to myself.
var || 'hi' will return 'hi' when false
var && 'hi' will return 'hi' when true
So:
var || 'hi' means:
return 'hi' if var is false
--or--
var ? var : 'hi'
and:
var && 'hi' means:
return 'hi' when var is true
--or--
var ? 'hi' : var
Wednesday, 4 January 2017
Flashing a bricked SP Racing F3 Flight Controller

I've been struggling for two days with this and finally found the solution. Scroll down for that.
Background:
So my UART2 plug broke off after a bad crash causing my quad to drop out of the sky on the next flight. Once I found the broken port, I thought that I could simply plug it into a new one, so I did.
Once connected I had problems getting the RX to be recognised, so I thought that the setting must be in Cleanflight. I went to the ports tab and changed some settings and boom, lost connection after saving. Since then I couldn't reconnect.
I tried the following, to no avail:
- I tried the Zadig driver fixer when the ports weren't available,
- I tried the ImpulseRC Driver fixer
- I tried the STM flash loader demonstrator - this worked after a few tries, but then I stopped being able to connect to the FC again.
- I tried various SP Racing firmwares, thinking that perhaps I didn't have the same model
Anyway, finally I find a reddit post and I actually read the whole thread for once, and way at the bottom I get the answer.
Solution:
- I went to 'Add or Remove Programs or Features' and removed the CP210 drivers(look for software by Silicon Laboratories Inc.)
- Then I removed the STM3 drivers, just search for STM in the list.
- Finally I installed the CP210 drivers again, and ignored the STM3 drivers.(these drivers can be downloaded from the links on the Cleanflight landing screen.
- I opened Cleanflight and in the Firmware Flasher I selected my FC model and firmware version. I also checked:
"No reboot sequence"
"Flash on connect"
"Full chip erase"
and "Manual baud rate" and I set it to 256000 - I then clicked on "Load Firmware(Online) and waited for it to be loaded
- I shorted out the two boot pins(google to find yours) on my FC and then plugged in the USB.
BOOOM! instant flashing, no more USB errrors or bootloader errors like before!
I hope this helps you as it helped me
I hope this helps you as it helped me
JavaScript replace() method's deviousness!
There is a trick to this method, if you do:
var test = 'old old old';
test = test.replace('old','new');
console.log(test);
The output would not be as expected, you would get:
'new old old'
However, if you remove the quotes and add regex tags:
test = test.replace(/old/g,'new');
You will get every instance replaced in your string.
My pleasure!
var test = 'old old old';
test = test.replace('old','new');
console.log(test);
The output would not be as expected, you would get:
'new old old'
However, if you remove the quotes and add regex tags:
test = test.replace(/old/g,'new');
You will get every instance replaced in your string.
My pleasure!
Tuesday, 22 November 2016
Setting up easy SSH connection.
We'll need to generate a key in order to access our server easily from our home machine.
To generate a key, enter the following on your client PC(probably the PC you're working on)
ssh-keygen -t rsa
You will be prompted to enter a filename of the key generated. It's not necessary, but should you decide to enter one, make sure to enter the full path of where you would like the file to be saved.
Enter file in which to save the key (/home/demo/.ssh/id_rsa):
Next, you will be asked if you want to enter a passphrase. This is great if you'd like to add some security client-side so that anyone using your machine can't just gain access to the remote server.
You will be prompted twice for the password:
Enter passphrase (empty for no passphrase):
This is what you'll see after completing the ssh-keygen operation:
Our next step is to copy the key to the remote server. Lucky for us there's an easy command to achieve this:
ssh-copy-id root@789.123.45.67
Enter the remote username and the remote IP as above.
You will be prompted for the password of the remote server. Enter it and the key will be copied over.
Once done, test if it all worked out by doing an SSH to the server and seeing if it logs you in automatically:
ssh root@89.123.45.67
Well done, so far so good. Now let's make things a little easier by adding an alias to the ssh command, that way we won't have to remember every server's IP address.
sudo vim ~/.bashrc
Ofcourse this assumes you use bash, I use zsh for example and had to edit my ~/.zsh file instead.
Once your file is open, enter the following on a new line:
alias myaliascommand="ssh root@89.123.45.67"
Press escape and run: :wq to save the file and exit.
Your bash aliases will be available on the next new terminal you open, but if you're like me, you don't like closing and opening terminals for no reason, simply run:
$ source ~/.bashrc
..and this will refresh the .bashrc resource in your bash.
Now test by typing myaliascommand and see how it connects to the server with a single command!
I hope this saves you tons of time, bye now!
To generate a key, enter the following on your client PC(probably the PC you're working on)
ssh-keygen -t rsa
You will be prompted to enter a filename of the key generated. It's not necessary, but should you decide to enter one, make sure to enter the full path of where you would like the file to be saved.
Enter file in which to save the key (/home/demo/.ssh/id_rsa):
Next, you will be asked if you want to enter a passphrase. This is great if you'd like to add some security client-side so that anyone using your machine can't just gain access to the remote server.
You will be prompted twice for the password:
Enter passphrase (empty for no passphrase):
This is what you'll see after completing the ssh-keygen operation:
ssh-keygen -t rsa
Generating public/private rsa key pair.
Enter file in which to save the key (/home/demo/.ssh/id_rsa):
Enter passphrase (empty for no passphrase):
Enter same passphrase again:
Your identification has been saved in /home/demo/.ssh/id_rsa.
Your public key has been saved in /home/demo/.ssh/id_rsa.pub.
The key fingerprint is:
4a:dd:0a:c6:35:4e:3f:ed:27:38:8c:74:44:4d:93:67 demo@a
The key's randomart image is:
+--[ RSA 2048]----+
|          .oo.   |
|         .  o.E  |
|        + .  o   |
|     . = = .     |
|      = S = .    |
|     o + = +     |
|      . o + o .  |
|           . o   |
|                 |
+-----------------+
Our next step is to copy the key to the remote server. Lucky for us there's an easy command to achieve this:
ssh-copy-id root@789.123.45.67
Enter the remote username and the remote IP as above.
You will be prompted for the password of the remote server. Enter it and the key will be copied over.
Once done, test if it all worked out by doing an SSH to the server and seeing if it logs you in automatically:
ssh root@89.123.45.67
Well done, so far so good. Now let's make things a little easier by adding an alias to the ssh command, that way we won't have to remember every server's IP address.
sudo vim ~/.bashrc
Ofcourse this assumes you use bash, I use zsh for example and had to edit my ~/.zsh file instead.
Once your file is open, enter the following on a new line:
alias myaliascommand="ssh root@89.123.45.67"
Press escape and run: :wq to save the file and exit.
Your bash aliases will be available on the next new terminal you open, but if you're like me, you don't like closing and opening terminals for no reason, simply run:
$ source ~/.bashrc
..and this will refresh the .bashrc resource in your bash.
Now test by typing myaliascommand and see how it connects to the server with a single command!
I hope this saves you tons of time, bye now!
Monday, 21 November 2016
Some trickyness when setting up git
Tell git to remember your passwords forever with:
git config --global credential.helper store
Set your upstream forever with:
git config --global push.default current
Make git remove the annoying .orig files after merging:
git config --global mergetool.keepBackup false
Make git forget about that file:
git config --global credential.helper store
Set your upstream forever with:
git config --global push.default current
Make git remove the annoying .orig files after merging:
git config --global mergetool.keepBackup false
Bonus commands:
Make git forget about a file that's already tracked:You've been tracking a file and realised it's not a good idea, so you added the file to the .gitignore, but git still wants to commit the changes you made to it, what do you do?Make git forget about that file:
git rm --cachedWednesday, 7 September 2016
Wordpress and AJAX headaches for days
I just spent over 3 hours wondering why my ajax function only returns 0, yet when I use the exact same function in PHP elsewhere, it returns the correct value.
Turns out, all ajax functions must exit, otherwise the wordpress engine will take over and do other evil things, ending up in world domination and the destruction of mankind!
add_action( 'wp_ajax_my_function', 'my_function' );
Turns out, all ajax functions must exit, otherwise the wordpress engine will take over and do other evil things, ending up in world domination and the destruction of mankind!
So remember, echo and exit, or your life will be hell!
add_action( 'wp_ajax_my_function', 'my_function' );
function my_function() {
    echo 'response';
    exit;
}
Subscribe to:
Posts (Atom)

-
I've been struggling for two days with this and finally found the solution. Scroll down for that. Background : So my UART2 plug b...
-
I have learnt a few things in the last few months of flying and I would like to share it with the world. There's no use struggling when ...

